Tutorial: Take Better Cell Phone Photos
Need some photos for your content like…yesterday, but you can’t do a session with your brand photographer yet?
Don’t worry friend, I gotchu. It only takes a few tips and tricks to bring your cell phone photo game from BLAH to BEAUTIFUL.
If you’re in the mood, feel free to watch my tutorial video, but in the meantime here are 5 main things to remember.
#1) CLEAN YOUR LENS
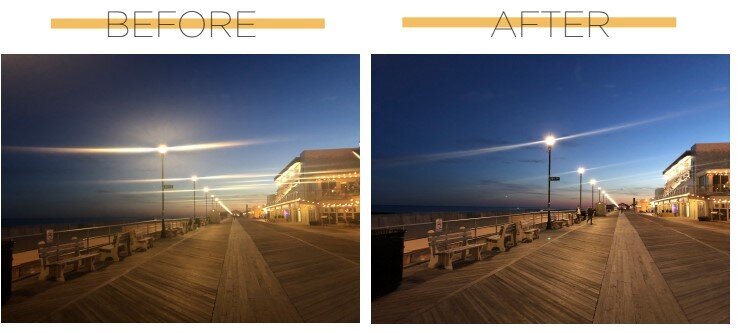
I can’t tell you how often I see dirty cell phone pictures. Our phones are already picking up dirt at a volume you wouldn’t believe, so whether you’re taking pictures for fun or for marketing, make sure to wipe your lens off before taking the shot! Just take a look at the difference it makes to this photo below — the colors are more vibrant, the image is clearer, and the streak from the lights is way less prominent.
#2) WATCH YOUR LIGHT
Photography literally wouldn’t exist without light. Window light is best for good photography whether you’re using a cell phone or not. But be weary of having too much light! Watch for squinting eyes, harsh shadows (especially underneath eyes), or uneven light that causes “light spotting,” i.e. light spots hitting your subject even if they’re in the shade.
BONUS: You can change the exposure on your cell phone camera by tapping on the little sun next to your yellow focus box and sliding it up or down based on how light or dark it is.
#3) RULE OF THIRDS
Composition isn’t just for the musicians, sweetheart. It’s a big part of photography and it can take your photos from boring to amazing. Envision a 3x3 grid across your image. Our natural instinct is to put our subject smack dab in the middle of that grid, Now try putting your subject to the left and a little higher. Or to the right and a little lower. That practice is called the Rule of Thirds and it tricks your mind. Your viewers have also been subconsciously trained to look for the subject right in the middle of the frame but if you move it to the side, you force your viewer to spend a little more time looking at it. And people spending more time with your content is a good thing. This works especially great if you have a lot of open space around your subject, like, for instance, a lot of sky. White space in photos is awesome as it gives your subject that much more of the spotlight.

#4) PORTRAIT MODE
The last time I bought a phone, the salesman was talking up this amazing new feature that was apparently going to replace my job.
“You won’t need to hire expensive photographers anymore with this baby,” he said. “So what is it that you do?”
The look of foot-in-mouth was the most priceless reaction I’ve ever seen when I shared my profession. It was a great day.
That being said, the feature he was pumping up is Portrait Mode, and it is pretty amazing. If you have an iPhone 7+ or newer, you have portrait mode. It’s a little tricky to master and it has its flaws, but it can result in gorgeous pictures that have been mistaken for the professional ones I take with my camera. *The Android equivalent is called Lens Blur.
A few pointers to make it work right:
Put your subject as far away from the background as possible. If you put it right up against your backdrop, you may as well just take the photo in normal mode.
Make sure the light is right! Portrait Mode won’t work in low light situations.
Wait until the the slide menu at the bottom has a yellow outline and the words NATURAL LIGHT appear with a yellow rectangle around them. That means the lens has caught on to the subject and has figured out what needs to be the focal point. This is not applicable for Android’s Lens Blur.
Snap then WAIT. Portrait Mode pictures take a little bit longer to process so just keep your phone where it is until it’s done.

Those blurry background feels are everything.
#5) WATCH YOUR EDGES
One of the biggest letdowns I see (and feel myself) is when I don’t pay attention to my edges. Photos end up looking distorted because the edges aren’t straight or intentionally crooked. Either make sure the edge of your frame lines up with the edge of your backdrop (like a building) or you can back up and also have your subject take a few steps towards you so that you’re not taking your photo looking up, so to speak.
Need a photo critique? Feel free to reach out! I’d love to help you out!